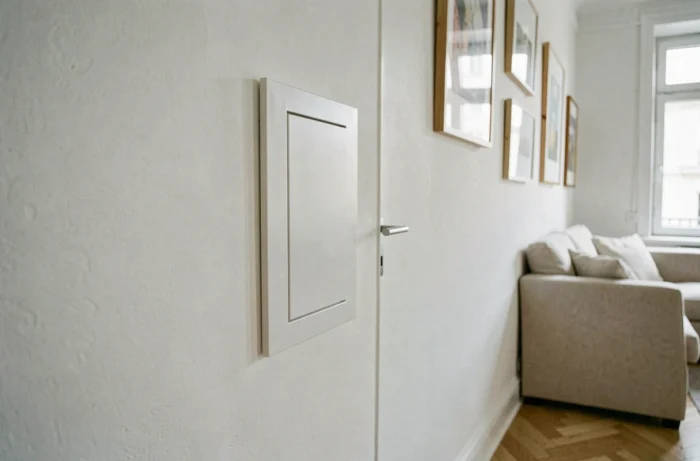
The technical housing shaft, or GTL, brings together the electrical panel, main circuit breaker and communications cabinet. Its role is essential, but its white PVC trunking often clashes with the interior décor. The good news is that several solutions can make it virtually invisible without compromising compliance with the NF C 15-100 standard.
1. Choose the right wall location for the GTL
Before thinking about covering or painting it, bear in mind that the location you choose will shape everything else. A GTL installed in an entrance hallway or utility room attracts far less attention than one in the middle of a living room.
Choose a wall in a thoroughfare or utility area (laundry room, adjoining garage, entrance closet). The standard requires the GTL to be accessible, but it does not have to be installed in a living area. An article on integrating an electrical GTL discreetly into a wall also points out that choosing the right location from the outset is the most effective way to keep it out of sight.
Also consider the orientation: a recessed wall, a spot behind an open door or a natural alcove can make the GTL less visible without restricting access for maintenance. Choosing the right location cuts the effort needed to conceal it in half.
2. Choose a compact or recessed GTL
Have you noticed how far a standard GTL trunking system protrudes? Some models extend several centimetres from the wall. Manufacturers such as Legrand and Schneider offer compact cabinets designed to take up less space.
In new builds, partially recessing the GTL into the partition is the most discreet option. It sits flush with the wall, much like an integrated communications cabinet. In a renovation, this requires cutting into the partition, which is not always possible (for example, with a load-bearing wall or a partition that is too thin).
A recessed GTL sits flush with the wall instead of protruding from it. If full recessing is not possible, a semi-recessed installation (with the trunking set halfway into the wall) offers a good balance between discretion and practicality.
3. Use a discreet cover for the trunking
A cover can be made by placing a panel, board or frame in front of the GTL. Several materials work well:
- An MDF panel painted to match the wall, attached with magnetic hinges for quick access to the electrical panel.
- A plasterboard panel mounted on a lightweight frame, which blends in visually with the existing partition.
- A laminate or melamine panel, useful in a kitchen or bathroom where moisture makes untreated MDF unsuitable.
The key point: the cover must never block access to the circuit breaker or the ETEL (the home’s electrical technical space). Use a tool-free opening system, such as a magnetic door or push-to-open hatch.

4. Integrate the GTL into a cabinet or tall unit
In a hallway or entrance, a tall cabinet built around the GTL turns a technical feature into storage space. The idea is simple: the cabinet surrounds the trunking and panel, with a solid door concealing the whole unit.
This approach works especially well when the GTL is near an existing closet. Simply extend the closet to enclose the technical area. The result looks like an ordinary storage cabinet.
Keep two requirements in mind. First, the communications cabinet and electrical panel must remain accessible without dismantling the furniture. Second, the cabinet must not block airflow around the electrical equipment, as this could cause overheating.
5. Paint or cover the GTL to match the room
The quickest and least expensive option is to paint the trunking directly. PVC can be painted as long as you first apply a primer suitable for plastics. A foam roller gives a smooth finish without brush marks.
Why does this trick work so well? Because the brain notices colour contrasts first. A white GTL on a grey wall stands out. Paint it the same grey, and it almost disappears.
Wallpaper or adhesive covering can also be used on the front. Matching the colour of the wall and trunking makes the installation less noticeable. Avoid glossy finishes, which catch the light and draw attention to the raised surface.
6. Conceal the wires and cables around the GTL
A perfectly concealed GTL loses its impact if cables are running along the outside. The wires connecting the electrical panel to sockets, switches and circuits should run inside the trunking or through recessed conduits.
In renovations where recessing is not possible, secondary trunking that matches the skirting board or door frame provides a neat route for the cables. Some models clip directly onto existing skirting boards.
One often-overlooked point: cables from the communications cabinet (network, fibre-optic and coaxial) must remain separate from power cables. This separation, required by the NF C 15-100 standard, prevents interference. Use separate compartments in the trunking or dedicated conduits for each type of current.
7. Provide discreet ventilation for the GTL
The electrical panel, circuit breaker and network equipment generate heat. Enclosing the GTL in a cabinet or behind a panel without ventilation can cause temperatures to rise and shorten the lifespan of the components.
The solution is to create discreet openings at the top and bottom of the cover. Slim ventilation grilles painted to match the panel go unnoticed while allowing air to circulate through natural convection.
If the GTL is built into a tall cabinet, drill ventilation holes at the top and bottom of the enclosure to create a chimney effect. Cool air enters at the bottom, while warm air escapes at the top. There is no need for a fan: convection is sufficient for the vast majority of home installations.
You can combine these tips. A well-chosen location, a compact model, a painted cover and carefully planned ventilation can turn a visible electrical installation into a feature that blends seamlessly with the décor. The one non-negotiable requirement is to keep the panel freely accessible and respect the ETEL clearances so that any work can be carried out when needed.